Monday, May 31, 2010

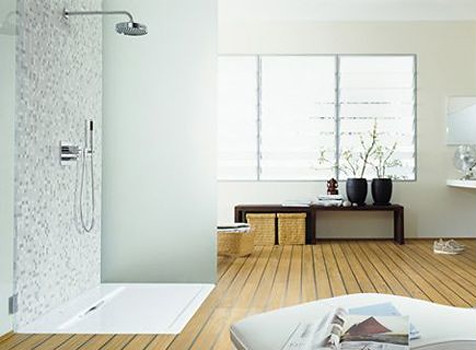
Watery trends: could water be the new colour scheme?

There is no greater way to pinpoint when a renovation was first done than doing the colour-check. If it's olive green and dusty pink, no doubt it's a 1980s vintage reno. A lurid orange or blinding green would be late 1970s. But which colours will be big in the future? According to Mudpie, a forecasting agency in London, watery hues are going to inspire us as we move towards 2012. Do you agree that we could all relax into watery-ness?

Related renovation and colour stories:

Pictures: MPDclick

Sunday, May 30, 2010

Screen the scene: how to use plants to block the unsightly view

There's nothing nicer than a wall of green, particularly in inner city locations where it's more likely that a wall of graffiti, a block of apartments or perhaps a neighbour who strolls around in his undies is in the way of the view you'd really LIKE to have. Screening plants are an old trick to improve the outlook and perhaps add $$$ to a property's value. Bamboo was a commonly used screening plant, until people discovered its root system blocked drains and it grew like a weed, infesting any small space with lush green. A good screening plant will grow high, rather than wide, and will not get out of control or become too large for its position. It takes research to discover the best plant for your desired location - there are now fancy bamboos that don't have invasive roots, murraya that will quickly fill out to a dense hedge and lilly pillies that won't grow into tall rainforest trees. 

Related renovation stories:


Quote of the week

"A man's home may seem to be his castle on the outside; inside, it is more often his nursery."Clare Boothe Luce

Or even an animal house! Learn how to build this dog feeding station here.

Related renovation stories:


Pictures: This Old House

Wednesday, May 19, 2010

Quote of the week

                     cotemaisonbathroom
"Be grateful for the home you have, knowing that at this moment, all you have is all you need."
Sarah Ban Breathnach

Picture: CoteMaison

Dome as a backyard shed, anyone?

Forget about sheds. I want a DomePod. Kinda like a cubby house for adults,  this 3.5metre mini-dome can be put in backyards without the need for an approval from council. Builder Chris Brown developed the dome home patent over the past 10 years with the assistance from the Australian Research Council and the QUT (Queensland University of Technology), to develop a building system that uses no timber or steel, has superior energy saving attributes, is capable of the extremes of the elements and climate change, such as cyclonic winds, fires and even earthquakes, while using 30% less materials than conventional construction methods.
With an almost unheard of 7.5 star rating from Q-Bears (Queensland’s construction energy efficiency watch-dog) for a recently completed three dome home on the Sunshine Coast, DomeShells is set to meet the sustainability and energy efficiency expectations of the most climate change conscious of home owners. The DomePod is a removable structure that can be taken with you when you move, so doesn't need council approval.Highly insulated and energy efficient the DomePod is ideal to remedy the space limitations many families are experiencing, while adding to the value of your property. DomePods start from as little as $13,750 plus delivery.

Related renovation stories:

Tuesday, May 18, 2010

Cutest kids' bedroom ideas (cheap cheap)

Over in my real job - at Kidspot - we've just interviewed superstylist Megan Morton on superstylish ways to make over a kids room without splashing much cash. The mother-of-three - who gave birth to baby Bea last year - has such a great imagination and eye. Some of her tips include:
- installing a ballet barre in a girls' bedroom. Great for deluding them into thinking they are ballerinas and a great hanging space for bags!
- giving kids a wall of blackboard paint. 
- using silicone tubs for toy storage rather than a large toy box that loses things!

Related renovation stories

Sunday, May 16, 2010

Jean Paul Gaultier's dazzling striped apartment

Oh, not sure you'd want to come home to this apartment after a few too many drinks. But. WOW. It's at least interesting. This apartment is in Paris and has great views of the Eiffel Tower, which would be enough to make me put up with having to bang into the wall while wearing wobble boots. What about you? Could you live in it?

Related renovation stories:


Wednesday, May 5, 2010

Creating your dream kitchen: Step Five

Now's the time to unleash your desires. It's all about having your layout and design organised on that little piece of graph paper and deciding how much it will cost to create that dream. This is where compromise comes in - sure you might want marble splashbacks, but how about a cheaper ceramic tile that looks similar? Or what about one of those new acrylic splashbacks that can be self-installed.
Once you've finalised your design, it's all about specifying, which is a fancy word for "final choice". Which materials and finishes will be in your dream kitchen? Can you gather prices for everything? Before you organise any trades or companies, you can have samples, pictures, ideas, print outs for everything you want in your kitchen. 

Related stories:

Pictures: Otthon and ALaCarteDesign

Sunday, May 2, 2010

Creating your dream kitchen: Step Four

Measuring up and creating a scale diagram of your kitchen-to-be is the next step of the process in shaping your dream kitchen. Designers like to steal this process from the renovator, because it can get complex - but there's no better way to get a handle on how well your dream kitchen will work than seeing it in little squares on bits of paper. Commonly nicknamed 'the graph paper shuffle' is a necessary part of planning out your kitchen on paper. Here's what to do:

Step one: Buy a graph pad where each square can equal 10cm, or you can create your own grid of equal squaes on a blank sheet of paper.

Step two: Measure the length of one wall with your tape measure, and draw a line on the graph paper to represent this length by counting each square. For example, the wall is four metres, so it is four squares on the graph paper or four lots of 10 squares

Step three: Measure every wall in the room, then the length of each door and window openings (without frames) and then add it to your drawing.

Step four: Draw windows as double lines and doors with a line and an arc indicating which way the door opens.

Step five: Measure the length and widths of all built in fixtures such as counters and add to the plan. You can also include details of power points (usually with an x) or light switches if you want extra detail in the plan.

Step six: Draw kitchen cabinetry on another sheet of graph paper, with each square representing the same scale as the main graph


Step seven: Cut out the individual pieces of floor cabinetry with scissors and move the cut outs around on the piece of paper to get an idea of how your base - or floor - cabinets will work. Check that oven doors or dishwashers won't block passageways.

Step eight: You can also cut out the overhead cabinets and colour them in to demarcate floor and above-counter overhead cabinets.

Step nine: Play around with cabinet shapes and sizes - create islands, galley layouts, l-shape or u-shape layouts to see which works best in your room.

Related stories:


Pictures: LivingETC

Saturday, May 1, 2010

Quote of the week


"Home is any four walls that enclose the right person."

Pictures:Alkemie
Related Posts with Thumbnails